ADVENTURE
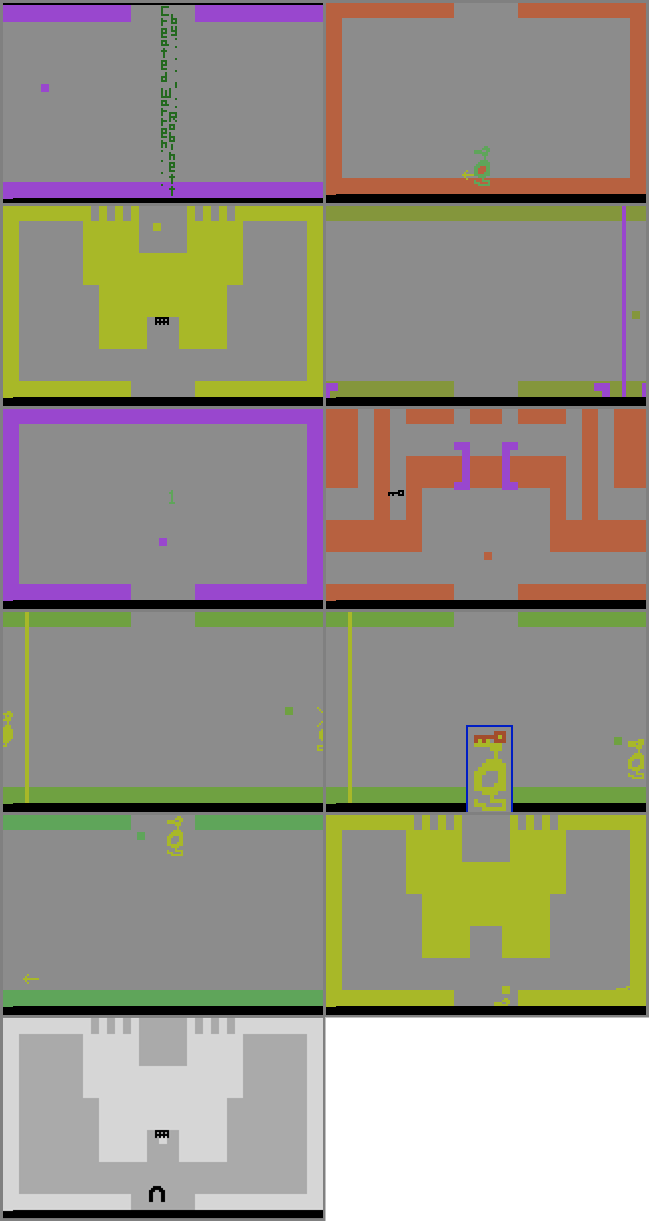
• EASTER EGG: Famous “secret dot and room”. On game 2 or 3, find the dot in the Black castle’s catacombs. Next, drop the dot and two other objects (except the bridge with the sword, Chalice, or magnet) in the room down and to the right of the Gold castle. Pass through the barrier to reveal the message, “Created by Warren Robinett” (picture #1 and video #1). A dragon can also be used instead of 2 objects. You can also pass through the lower right barrier underneath, although there’s no room behind it. Adam Clayton wrote to Atari in August 1980, describing how to find the dot and unlock the message, a year before Electronic Games confirmed its existence, and nearly 2 years before Atari published the details in Atari Age. Warren even kept a copy of Adam's letter! {Adam Clayton}
• EASTER EGG: Alternate method - Having the dot on the entrance screen to the secret room is not required. The program only checks to see whether or not it's been relocated to any other screen other than where it's originally located. Once moved, the bridge can be used to gain entrance to the secret room via the catacombs below it. {Kurt Howe}
• If you are eaten by a dragon, the sword won’t have any effect on it (picture #2). If the bat picks up the dragon (with you in it) and you’re still holding the sword, you can actually still kill other dragons if you fly into them. Also, sometimes when a bat is carrying you & the dragon, you’ll start flying at high speed all over the kingdom (even into some locked castles), and you might even have a bit of control over which direction he flies! {Tony Roy and Scott Stilphen}
• You cannot be eaten by a dragon if you are pushing down against a wall. {Jamie Lantry} If you stand at the very edge on the right side of the screen, dragons can’t eat you, and they’ll disappear if they try. {Scott Stilphen} Also, Rhindle (red dragon) can’t eat you if you push up against a wall and are positioned directly above his nose. This is due to how Rhindle’s movements were handled. Both the player and Rhindle move at 3-pixel jumps (i.e. their x/y positions are altered by +/- 3 pixels whenever their subroutines are called); the other move 2 pixels at a time. {Kurt Howe}
• The bridge can be used to get on top of castles (picture #3 and video #2). It can also be used to get into the secret room (picture #4), but you’ll be trapped between the 2 barriers unless you’ve touched the dot.
• Flicker-fest - Place ALL items (secret dot included) in the Gold castle (hint: use bat to get the dead dragons inside), leaving the Chalice for last (video #2) - remember to precede Chalice into the castle or you’ll miss it! {Russ Perry Jr.} For even more flickering, place all the objects outside the castle (the gate is another object), a room in one of the dark mazes, a room with a barrier, or in the secret room.
• Stationary bat - The bat can sometimes be found stationary (i.e. not flying around)! This can only happen in game #1 (where the bat is given no initial flight direction and no movable objects are present in its room to alter it) and game #3 (when the random routine assigns the same room number to both the bat and sword). You can often find the stationary bat carrying the sword in the white castle, on the upper screen on the right (just above the one you can't reach without the bridge). You can pick up and drop the bat as much as you want, but it'll fly off as soon as it sees another object. The problem with game #3 is that the bat and the sword are given identical horizontal and vertical co-ordinates (20,20). The random routine used to shuffle objects does not change co-ordinates, only room numbers. The generic movement routine used for everything dictates that if one object shares the same co-ordinates as the object it wants, it should stop moving (hence, the dragons stay right on the objects they guard and a magnet-attracted object stays put when reaching it). Although the bat is given an initial flight direction of down and left, this is trumped when it appears on a screen with any object it wants and it will head toward it for pickup. But in the case of game #3, the sword is not at any direction; the co-ordinates are the same as the bat. It's picked up and the bat doesn't fly anywhere, because it didn’t need a direction to reach it. If you want to see the stationary bat for yourself, using an emulator, change the value at $f396 from $11 to $17 so that you begin the game in the white castle. Keep restarting the game until you see the stationary bat, and then change the value at $a8 and $e2 to $11 and start playing normally. When you enter the white castle (without carrying an object), the bat will still be there. {Luc Pycke}
• It’s possible for the bat to win the game for you, if it’s carrying the chalice and either touch the gold castle’s gate. Hardware collision-detection is used to move objects into a castle, so you must be present on the screen for this to happen. Interestingly, if only the chalice hits the gate, the game is won but the chalice immediately reappears next to the bat again (a bat's held object is automatically given the same room number as the bat, and the collision routine that moves objects into castles no longer executes when the game is inactive). {Luc Pycke}
• The bat can be locked away in a castle. You can also lock a castle’s key inside of it. Use the key to close the gate and drop the key on the gate before it completely closes. {Scott Stilphen}
• The bat can sometimes be found stationary (i.e. not flying around)! You can often find the stationary bat carrying the sword in the white castle, on the upper screen on the right (just above the one you can't reach without the bridge). You can pick up and drop the bat as much as you want, but it'll fly off as soon as it sees another object. If you want to see for yourself, using an emulator, change the value at $f396 from $11 to $17 so that you begin the game in the white castle. Keep restarting the game until you see the stationary bat, and then change the value at $a8 and $e2 to $11 and start playing normally. When you enter the white castle (without carrying an object), the bat will still be there. {Luc Pycke}
• Put the magnet on top of the gold castle, bring the chalice to that screen and drop it, and then leave before it gets pulled across the gate. Wait a few seconds and then return. The game won’t end, even though the chalice is now inside the castle! You have to either enter it, or press RESET.
• Start a game and then press SELECT to get the selection screen. Pull down and your character will appear (picture #5). {Ray Wilmott}
• Different “victory” music can be played by hitting SELECT immediately after putting Chalice in the Gold castle (video #2). {Scott Stilphen}
• With the chalice above you, if you go to enter the gold castle and drop it at the same time it touches the gate, it will end up in the castle and the game will instantly end (no music will play)!
• Order of magnetism (highest to lowest): gold key - white key - black key – sword – bridge - chalice. Magnet can be used to drag items across castle gates, dropping them inside. {Scott Stilphen}
• BUG: There is a (intentional?) loophole in game #1. Rooms are shuffled around to make the map smaller. The upper room of the catacombs "dungeon" is used as the black castle interior. So dragons wandering around can end up inside the castle just from following room links...whether it is locked or not, and whether they are onscreen or not. I'm not sure if this was intended, because the programmer stressed that he wanted all paths to be retraceable. An object can also leave the black castle the same way. {Kurt Howe}
• BUG: There is a room in the maze of the White castle that has what appears to be an entrance/exit at the bottom of the screen, but you can’t go through it (picture #6). The passage was originally intended to lead to the upper part of the white castle (i.e. the "balcony"). Warren Robinett decided not to use this idea, but the wall graphics were not corrected. From Warren: "One of these exits is the normal one through the door of the castle, but the other exit, from the hard-to-get-to room in Section 2, leads to the 'balcony' of the White Castle. The link from the Red Maze to the balcony is one-way, however; it is not possible to go back into the Red Maze from the balcony. This violates my principle of making all paths retraceable, and was a mistake--an earlier idea that was rejected but never expunged".
• BUG: Objects and dragons can wrap-around horizontally, and sometimes vertically (picture #7). For a wrap-around trick, put the bridge through the top wall in the Gold castle. {Scott Stilphen}
• BUG: Freezing Yorgle (yellow dragon) - If you place the gold key on Yorgle’s head (picture #8 – see inset for exact positioning) he will become paralyzed! You can also trap him between 2 rooms by using the gold key and the sword – dragons fear the sword when the Right Difficulty switch is set to A. For example, place the gold key on one side of the gold castle and the sword on the screen below it (down in the opposite corner). Lure the dragon to the center of the screen with the sword and put the switch on B. The dragon will run up (away from the sword) and stop when it gets to the top of the screen (pictures #9 and #10) {Paul J. Champeau}
• BUG: Freezing the bat (game 1 or 3) - To do this trick, first make sure that the bat is flying in a straight left-to-right pattern on any wrap-around screen (such as the area below the yellow castle). Next, make sure it’s consistently exchanging 2 items (other than dragons or the magnet) in its flying pattern. Each time the bat switches items, the one being dropped will move towards the right side of the screen. Eventually the item will wrap-around. As soon as it’s fully visible on the left side, the bat will freeze in a flying motion the next time it attempts to take the item, and won’t move as long as no other objects are shown to it.
Another way to freeze the bat involves carrying the bat to a screen and position it at identical co-ordinates as an object that it would prefer over any object it currently carries, and then hit RESET. It's tricky is because a bat has its own 3-pixel flight direction which is trumped from being held by you, so when positioning it on the object, you'd need to adjust this by 3 pixels in the opposite direction of where it currently flies. In other words, although it is held by you, the bat is constantly flying 3 pixels away in its current heading. The routine that deals with your held object overwrites this, so the movement is not visible before displaying the screen.
• BUG: If too many objects (more than 2) are in a room, it may be difficult or impossible to pick up an object, open a gate, or kill a dragon.
• BUG: Due to an error in the random object placement code, there’s a 1-in-18 chance that the yellow key will start out inside the yellow castle, making the game unbeatable. This only happens in level 3. {Warren Robinett}
• BUG: When you bring the secret dot in the room with the upper-left barrier, the barrier will disappear although you still can’t move beyond it.
• BUG: If you drop an object just as you’re entering a castle screen, you won’t be able to enter the castle (picture #11) unless you approach the gate from the right side. {Greg Bendokus}
• FRYING: Get a different-colored “selection” screen, or one with other items/dragons/bat on it (whatever objects appear in that room, those objects won't be in the game when you play it. So if a dragon ends up in this room, he won't be in the game. If all objects are in the room, you'll be all alone in the kingdom.). Start a game at any level and the black "barriers" may have moved to where you can get around them using the entrances at the top and bottom of the screen. Also, the layout of the kingdom will be quite different in some areas, and most of the time all castle doors are wide open! {Tony Roy}